Monday, July 26, 2010

Chocolate Truffle Torte


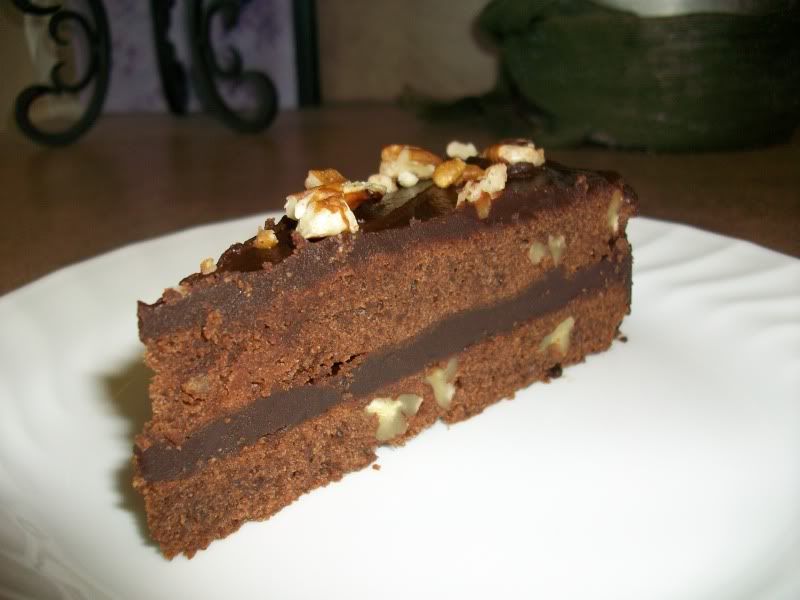
Some people say that diamonds are a girl's best friend.  I beg to differ.  I say that chocolate is a girl's best friend.  =)  If you want to have a special occasion dessert to impress your friends, this is it!  On May 30, we had our daughter, Hannah, dedicated at church.  After the dedication, we invited our family over for lunch and desert.  My family may never remember what was for lunch (spaghetti), but they will most likely remember what was for dessert.   This is a time consuming recipe, but it is so worth it.  The truffle filling literally melts in your mouth!  We were so anxious to eat it that we cut into it before I remembered to take pictures.  Oops!  Warn your man before you serve this to him that it is NOT a cake.  It is a torte.  My husband was confused on how short and dense it was.  Before I cut it he said, "I thought you layered the cake."  *Insert my rolling eyes here* I tried to explain to him that it was not a cake...it's a torte and it's not supposed to be big and fluffy.  He didn't worry about it too much anymore after he took his first bite.  ;-)  This is yet another great recipe that I found in my trusty Betty Crocker Cookbook.


Chocolate Truffle Torte
Prep: 35 min; Bake 25 min; Cool 2 hours
Makes 12 serfivings

1 pkg (6 ounces) semisweet chocolate chips (1 cup)
1/2 cup stick margarine or butter
1/2 cup all-purpose flour
4 eggs, separated
1/2 cup sugar
1 pkg (2 1/2 ounces) hazelnuts, finely chopped and toasted (2/3 cup) [I used pecans]
Chocolate Truffle Filling - See below
Whole or chopped hazelnuts, if desired

1. Heat oven to 325.  Grease bottoms and sides of 2 round pans, 9 x 1 1/2 inches, with shortening.  Line bottoms of pans with waxed paper or cooking parchment paper.
2. Melt chocolate chips and margarine in heavy 2 quart saucepan over medium heat, stirring constantly; cool 5 minutes.  Stir in flour until smooth.  Stir in egg yolks until well blended. 
3. Beat egg whites in large bowl with electric mixer on high speed until foamy.  Beat in sugar, 1 tablespoon at a time, until soft peaks form.  Fold chocolate mixture into egg whites.  Fold in toasted hazelnuts.  Spread in pans.
4 Bake about 25 minutes or until tops of cakes appear dry and toothpick inserted in center comes out clean.  Cool 5 minutes. Run knife along side of each cake to loosen; remove from pan to wire rack.  Remove waxed paper.  Cool completely.  
5. Prepare Chocolate Truffle Filling.  Spread 2/3 cup of the filling on bottom layer. Top with other layer.  Frost top and sides of cake with remaining filling.  Drizzle with any remaining filling and garnish with hazelnuts.


Chocolate Truffle Filling


Prep: 5 min; Cook: 5 min; Chill: 40 min
Makes 12 servings, about 1 2/3 cups

1 pkg (12 ounces) semisweet chocolate chips (2 cups)
1/4 cup stick margarine or butter
1/2 cup whipping (heavy) cream or hazelnut-flavored nondairy liquid creamer

1. Heat chocolate chips and margarine in heavy 2-quart saucepan over low heat, stirring constantly, until chocolate is melted; remove from heat.
2. Stir in whipping cream.  Refrigerate 30-40 minutes, stirring frequently, just until thick enough to mound and hold its shape when dropped from a spoon.  If filling becomes too thick, microwave on High (100%) 10 to 15 seconds to soften.  Fills and frosts one 8- or 9-inch cake layer, split.


The Girl Creative
Making


It's a Blog Party


Monday, July 19, 2010

Soft Pretzels


I love it when I'm walking through the mall and I pass by one of those soft pretzel shops!  They always smell so good!  The smell will make me start to salivate when I'm still 5 stores away.  They are just so wonderful.  So chewy...and buttery...and perfect in every way!  They only thing that I don't like about them is paying for them.  I'll be honest, I'm tight with our money when it comes to that sort of thing.  So I wasn't sad when I happened to come across several recipes for them online!  This recipe is from one of my favorite blogs Creations by Kara.  She always has the best things on her site.  These pretzels are so easy!  Have fun and enjoy!

Soft Pretzels
1/2 cup warm water
2 Tbsp yeast
1 cup milk
1 1/2 tsp salt
2 Tbsp sugar
4 cups flour

Add yeast to warm water..  Add sugar, salt, and milk.  Stir in flour to make a stiff dough.  (Unlike most bread recipes, you want plenty of flour.  That makes the pretzels chewier.)  Knead on floured counter about 5 minutes.  Let dough rest for 5 minutes.  Form into pretzels following the instructions below.  Bake at 400 degrees F for about 15-18 minutes.  Depending on the size of your pretzels, this recipe makes about 10-12 pretzels.

  1. Pull off an egg sized ball of dough.


  1. Roll the dough into a rope about 14"-20" long.  I roll it until it is about the diameter of a pencil.


  1. Cross ends to make a loop.


  1. Twist ends one time. (Sorry the picture is fuzzy)


  1. Bring the ends down


  1. Tuck ends under the bottom of the loop and place on a greased cookie sheet.


  1. Brush pretzel with milk and sprinkle your favorite toppings.  I'm boring. ;-)  I stuck with course sea salt.  So very yummy!


  1. The finished product.  


  1. Happy baking!!!


Creations by Kara


For those of you that are admiring my plate, it is a Moda Home product, but I'm sorry to say that it has been discontinued.  For a limited time, there are a few left here in a different print.  Get them fast before they are gone!


The Girl CreativeMakingAll Thingz Related

 It's a Blog Party 


Monday, July 12, 2010

Ninety Minute Cinnamon Rolls


Cinnamon rolls are the ultimate comfort food in my opinion.  They are soft, chewy, crispy, and have all the sweetness anyone could ever ask for!  They are good any time of the year and always put a smile on people's faces.  What's not to love?  I have made these rolls a few times and have not been disappointed yet!  It says 90 minutes, but it took about 2 hours for me.  But then, I'm a little slow when I work.  I'd be curious to know if anyone does actually make them in 90 minutes.  I got this recipe from www.allrecipes.com and added my own icing.  Here is the recipe word for word as seen on the original source, and I'll put my own tips at the bottom.

Ninety Minute Cinnamon Rolls

Prep Time: 20 mins; Cook Time: 20 mins; Ready in: 1 hour 30 mins
Makes 12 rolls

3/4 cup milk
1/4 cup margarine, softened
3 1/4 cups all-purpose flour
1 (.25 ounce) package instant yeast
1/4 cup white sugar
1/2 teaspoon salt
1/4 cup water
1 egg
1 cup brown sugar, packed
1 tablespoon ground cinnamon
1/2 cup margarine, softened

Directions:

  1. Heat milk in small saucepan until it bubbles, then remove from heat.  Mix in margarine; stir until melted. Let cool until lukewarm.
  2. In a large mixing bowl, combine 2 1/4 cup flour, yeast, sugar, and salt; mix well.  Add water, egg and the milk mixture; beat well.  Add the remaining flour, 1/2 cup at a time, stirring well after each addition. When the dough has just pulled together, turn it out onto a lightly floured surface and knead until smooth, about 5 minutes.
  3. Cover the dough with a damp cloth and let rest fro 10 minutes.  Meanwhile, in a small bowl, mix together brown sugar, cinnamon, softened margarine.
  4. Roll out dough into a 12x9 inch rectangle.  Spread dough with margarine/sugar mixture.  Roll up dough and pinch seam to seal.  Cut into 12 equal size rolls and place cut side up in 12 slightly greased muffin cups.  Cover and let rise until doubled, about 30 minutes.  Preheat oven to 375 degrees F (190 degrees C). 
  5. Bake in the preheated oven for 20 minutes, or until browned.  Remove from muffin cups to cool.  Serve warm.
My tips for this recipe - 
  1. As I already stated, this took me closer to 2 hours to complete
  2. Step #2 says to knead about 5 minutes.  I typically knead for closer to 10.  
  3. Step #4...there are several things to note here. 
  • When spreading the margarine/sugar mixture onto the dough, leave about a 1/2 inch of dough uncovered on the long side at the top of the rectangle.  Start rolling from the bottom until you reach the uncovered portion of the dough.  Take a small bowl of water and wet your finger and run it across the uncovered portion of the dough, then pinch the seam together.  The water will help the seams stick better.
  • To cut the rolls, take either a long piece of un-waxed floss or a long piece of thread; place the middle of the thread under the roll and cross the thread on the top and pull tight until the thread has pulled free.  Continue to do this until there are 12 roll.  I find it easiest to cut the roll in 1/4's.  Then cut 3 rolls from each 1/4.
  • I have never put the rolls in muffin cups.  It just seems WRONG! =)  I put them in two 9-inch round pans.  You could also put them in a 9x13 pan.
  • You can prepare these then leave them in the refrigerator to rise overnight.  The next morning allow them to set at room temperature for 30 minutes then bake them as directed.     
     4.  There is something REALLY WRONG with a cinnamon roll without icing!!!  I don't know what was
          going through their minds when they decided not to ice these things.  I use this really simple recipe:

Icing 
2 Tbsp butter, melted
1/8 tsp salt         
3 cups powdered sugar
3-4 Tbsp milk
1/2 tsp almond extract or 1 tsp vanilla (I prefer the almond extract)

Whisk all ingredients till smooth.  If necessary, add more milk 1 tbsp at a time until it has reached the right consistency.  Spread on warm rolls while they are still in the pan.

This recipe doesn't come with the nutrition facts.  I'll sum it up for you real fast:

They are bad for you!  

ENJOY!!!

Monday, July 5, 2010

Overnight Danish Twist

OMGSH!  These are so good!  I love to eat treats that make you feel like you've been to a bakery.  It's so much more satisfying to know that YOU made them. =)  This is an easy pastry to make and they are so pretty.  This is another recipe that I got from my handy dandy Betty Crocker cookbook. (You can find a link to purchase the book at the end of this post.)  I'm putting the exact recipe down here word for word out of the book and at the very bottom I'll give you a few tips.  OK...I'll quit stalling, here's the recipe.

Overnight Danish Twists
Prep: 55 min; Chill: 8 hr; Bake 15 min
Makes 27 twists

2 packages regular or quick active dry yeast (or 4 1/2 teaspoons out of a jar)
1/2 cup warm water (105 to 115 degrees)
4 ups all-purpose flour
1/3 cup sugar
2 teaspoons salt
1 cup cold stick butter, cut into small pieces
4 large eggs (separated)
1 cup ilk
Jam or preserves
Powdered Sugar Glaze (Below)

  1. Dissolve yeast in warm water in large bowl.  Mix in flour, sugar and salt.  Cut in butter, using pastry blender or crisscrossing 2 knives, until mixture looks like fine crumbs.
  2. Separate egg yolks from egg whites; refrigerate egg whites for use in steps 5 and 7.  Stir egg yolks and milk into flour mixture until soft dough forms.  Cover bowl with plastic wrap and refrigerate at least 8 hours but no longer than 24 hours.
  3. Lightly grease 2 large cookie sheets with shortening.
  4. Punch down dough.  Divide dough into 3 equal parts.  Roll 1 part dough at a time into rectangle, 9 x 7 inches, on lightly floured surface.  (If dough becomes too sticky while shaping, refrigerate 5 to 10 minutes.) Cut rectangle crosswise into nine 1-inch strips
  5. For each twist, pinch ends f each strip together to form ring, stretching strip slightly, then twist to from figure 8.  Place at least 2 inches apart on cookie sheet.  Brush with egg white.  Let rise uncovered t room temperature about 25 minutes or until dough is puffy and lops fill in.
  6. Heat oven to 350
  7. Make an indentation in center of each loop.  Fill with 1/2 to 1 teaspoon jam.  Brush dough with egg white.  Bake about 15 minutes or until light golden brown.  Immediately remove to wire rack; cool slightly.  Drizzle Powdered Sugar Glaze over warm twists.

Powdered Sugar Glaze
1 1/2 cups powdered sugar
3/4 teaspoon vanilla
2 to 3 tablespoons water or milk

Mix all ingredients until smooth.  If necessary, stir in additional water, 1/2 teaspoon at a time, until drizzling consistency.

My tips for this recipe -
  1. I needed 5 cups of all-purpose flour.  The dough was too sticky and there was no hope of rolling out the 9 x 7 rectangles.  Ugh...what a mess! 
  2. I used a strawberry fruit spread instead of jam.  No high fructose corn syrup and uber yummy!
  3. You really only need about 2 egg whites.  But, your first time to make these, it wouldn't hurt to keep them all.  You never know.
  4. Step #1 says to "Cut in butter, using pastry blender or crisscrossing 2 knives, until mixture looks like fine crumbs."  I cut the butter into small cubes, then mashed them into the flour mixture looked like fine crumbs.
  5. I made 21...not 27 twists as the recipe says. I realized later that I cut 7 strips instead of 9 strips in step #4.  They still baked evenly and were a little bigger.  =)  Is that so wrong?
OK, I know there are some of you out there that want to know the nutrition facts.  Just so you know, it takes all the fun out of it!!  So for all the A types...here you go...but I'm not happy about it. :-P

1 Twist:  Calories 190 (Calories from Fat 70); Fat 8g (Saturated 5g); Cholesterol 50mg; Sodium 220mg; Carbohydrate 28g (Dietary Fiber 1g); Protein 3g

LinkWithin

Related Posts with Thumbnails