Thursday, December 9, 2010

S'more Pie


I know that most of you will look at that and say, "That's a summer treat!"  But I beg to differ!  There aren't many things better than sitting around a hot fire on a cool late fall/early winter night while roasting marshmallows. Can you smell the campfire?  Mmmmmm, I can.  Every year we go camping in mid November and one of my favorite parts of camping is hanging out by the fire at nights.  But, I'm not satisfied with just marshmallows.  Nope.  I have to make mine even more bad for me.  That's right.  I have to make a sandwich out of my marshmallow with chocolate and graham crackers.  (My mouth is watering.)  It is sacrilegious any other way.  (OK, maybe not that bad.)  So a couple of days after we got home from camping, I was craving a s'more.  I thought, there HAS to be some sort of a s'more recipe out there in blog land.  And sure enough, I found one.  *insert high pitched squeal here*  I found it on Smitten Kitchen.  I'm pretty sure I have the biggest blog/baking crush on Deb at Smitten Kitchen.  She has some of the most delicious looking recipes and beautiful photography!  So I was soooo excited when I found the recipe here.


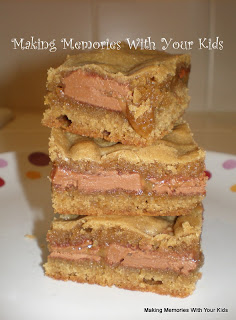
I made the crust.  It was beautiful.  I made the chocolate cream filling.  It was beautiful.  Then I started on the homemade marshmallow.  It was....interesting.  I knew that I had probably gone wrong somewhere when my marshmallow wasn't as stringy as the recipe warned it would be.  But, I left it on the pie anyway.  I set the oven to broil and put the pie in.  I came back 4 minutes later to a flaming marshmallow.  *sigh*  I pulled the pie out and blew out the flame...just like you would if you caught you mallow on fire while camping.  I was highly annoyed because not only was the marshmallow burned on top, but a little of the crust got charred as well.  *double sigh*  Then I remembered that when you burn a marshmallow, you can pull off that layer and there will still be more that you can roast.  Eureka!  So I started pulling off the top layer of the marshmallow to find a white liquid underneath.  Seriously?!  So, I discovered that something was more wrong with my marshmallow than I thought.  *triple sigh*  It was as if I melted all of the marshmallow?  I spooned all of the liquid off of the chocolate layer and then replaced it with store bought mini marshmallows.  *quadruple sigh*  That was pretty defeating.  I've never made homemade marshmallows before.  I remember the first time that I found out one of my friends makes them.  I thought she was a NUT!  I thought, marshmallows are too cheap to bother with!  And quite honestly, I have continued to feel that way until now.  Those that know me in real life will tell you that I am pretty stubborn.  I can tell you now that I WILL master homemade marshmallows.  I will make marshmallows until I can't stand it any longer to make them perfect.  I WILL redeem myself and make the s'more pie the way it is supposed to be made!!!  Until then, here is the recipe of the delicious pie word for word as on Smitten Kitchen.
Yes, those are small little flames on the right side. 


Smore Pie
Adapted from Gourmet, November 2006
Don’t be daunted by the number of steps in this pie–it is surprisingly simple to make, yes, even the marshmallows.
The biggest trick with the marshmallows is how messy they are. You’ll be tempted to break a strand of marshmallow between the bowl and your pie with your finger, it will then stick to your finger and you’ll use another finger to clean that one off and end up with sticky cobweb hands and strings of marshmallow everywhere, so don’t do it–use another spatula instead. Trust me, this has happened to me each time.
Of course, you could take a lot of shortcuts. You could buy an already-prepped graham cracker crust and/or you could line the chocolate layer with store-bought marshmallows and toast them instead. But then how would you play “Look! I’ve Got Spiderman Hands!” in the kitchen?
For crust
5 tablespoons salted or unsalted butter, melted, plus additional for greasing
1 1/2 cups cookie crumbs (10 graham crackers or 24 small gingersnaps; about 6 oz, pulsed in a food processor until finely ground)
2 tablespoons sugar
1/8 teaspoon salt (omitted if you use salted butter)
For chocolate cream filling
7 oz fine-quality bittersweet chocolate (not more than 70% cacao; not unsweetened), finely chopped
1 cup heavy cream
1 large egg, at room temperature for 30 minutes
For marshmallow topping
1 teaspoon unflavored gelatin (from a 1/4-oz package)
1/2 cup cold water
3/4 cup sugar
1/4 cup light corn syrup
1/2 teaspoon vanilla
Vegetable oil for greasing
Special equipment: a candy thermometer
Make graham cracker crust: Put oven rack in middle position and preheat oven to 350°F. Lightly butter pie 9- to 9 1/2-inch pie plate. Stir together all ingredients in a bowl and press evenly on bottom and up side of pie plate. Bake until crisp, 12 to 15 minutes, then cool on a rack to room temperature, about 45 minutes.
Make chocolate cream filling: Put oven rack in middle position and preheat oven to 350°F. Put chocolate in a large bowl. Bring cream just to a boil in a 1- to 1 1/2-quart heavy saucepan, then pour hot cream over chocolate. Let stand 1 minute, then gently whisk until chocolate is melted and mixture is smooth. Gently whisk in egg and a pinch of salt until combined and pour into graham cracker crumb crust (crust will be about half full).
Cover edge of pie with a pie shield or foil and bake until filling is softly set and trembles slightly in center when gently shaken, about 25 minutes. Cool pie to room temperature on a rack (filling will firm as it cools), about 1 hour.
Make marshmallow topping: Sprinkle gelatin over 1/4 cup cold water in a large deep heatproof bowl and let stand until softened, about 1 minute.
Stir together sugar, corn syrup, a pinch of salt, and remaining 1/4 cup water in cleaned 1- to 1 1/4-quart heavy saucepan. Bring to a boil over moderate heat, stirring until sugar is dissolved, then boil until thermometer registers 260°F, about 6 minutes.
Begin beating water and gelatin mixture with an electric mixer at medium speed, then carefully pour in hot syrup in a slow stream, beating (avoid beaters and side of bowl). When all of syrup is added, increase speed to high and continue beating until mixture is tripled in volume and very thick, about 5 minutes. Add vanilla and beat until combined, then immediately spoon topping onto center of pie filling; it will slowly spread to cover top of pie. Chill, uncovered, 1 hour, then cover loosely with lightly oiled plastic wrap (oiled side down) and chill 3 hours more.
Brown topping: Preheat broiler. Transfer pie to a baking sheet. Cover edge of pie with pie shield or foil and broil 3 to 4 inches from heat, rotating pie as necessary, until marshmallow topping is golden brown, about 3 minutes. Cool pie on a rack 10 minutes. Slice pie with a large heavy knife dipped in hot water and then dried with a towel before cutting each slice.
[Alternately: I browned the topping with a creme brulee torch. It took some time and didn't get as brown as I think it would have under the broiler (the pie was still cold, and hard to heat up with a small flame) but it does work in a pinch, or when you're away from the oven.]
Note: Pie (before browning topping) can be chilled up to 1 day.


Linking up at these fun parties:

Monday, December 6, 2010

Sorry!

The cast of "For Unto Y'all" 

Sorry y'all!  Please excuse my break from blogging last week!  At church we were preparing for our annual Christmas musical.  My husband, oldest son, and I were all in the production and we were BUSY!  We had 3 performances this past weekend and are now finished.  I can't wait to share this week's recipe with you!!!

Wednesday, November 24, 2010

Recipes I Can't Wait to Try! #10

Yay for Recipes I Can't Wait to Try!!!  This weeks feature was pretty easy to decide on. =)  Joseph's Grainery always has the tastiest things to link up!  I love that they do everything with whole grains.  My husband and I are always looking for ways to blend in healthier ingredients into our foods.  Thanks to Joseph's Grainery for all of the great ideas and for being such a loyal linker!

Photo is property of Joseph's Grainery


Thumbprint Cookies at Joseph's Grainery


Now let's see some Recipes I Can't Wait to Try!  Link up your yummy recipes & fun crafts!  My request is that you please link back to me in some way and say, "Hi!" to another party goer!  Everyone loves getting a new comment, so show some love!  =)  Also, this week I've made it a blog hop, so feel free to add it to your own blog.  Enjoy!


If you were featured, feel free (but not pressured) [=)] to grab my button!
Photobucket 


Recipes I Can't Wait to Try!

Tuesday, November 23, 2010

Cherry Chocolate Pie and Applied Labels Review!


It seems that we are always going to some sort of potluck.  As a matter of fact, we host a Bible study at our home twice a month, and you guessed it...it is a potluck.  Of course as you are all very much aware (unless you've been living under a rock), the holidays are upon us!  You know what that means?  Potlucks!  ;-)  With all of this 'pot luckin', it is so easy to get your dishes mixed up.  I sent a cherry pie (the recipe will be below) with my husband to work for his Thanksgiving spread.  After all of the food has been eaten, do you think he's going to know which dish is mine?  Probably not.  Not that he doesn't care, just that plain Jane Pyrex dishes are a dime a dozen and there will probably be several there.  I needed some way to label my pie plate.  I have done it the ghetto way before.  You know what I'm talking about...masking tape with your name across it.  SMH.  I am so glad that I received my new labels in the mail from Applied Labels a couple of days ago!  They are so much cuter than masking tape!!!   These labels were actually created as a way to label baby bottles, clothing, or shoes; but I have used them for labeling my dishes.  =)   They included a couple of really useful things in my pack.  The added Shoe Shields to my order.  They are basically a clear sticker that you place over your label to prevent your foot eventually from rubbing the ink off of your label.  Cool huh?  Be sure to check out Applied Labels on Twitter & Facebook.  They have some extra special deals they list on their Twitter page.  I'll give you a REALLY BIG HINT....CYBER MONDAY!  Oh yeah, and when you visit them, please let them know that I sent you!  =)


Cherry Chocolate Pie
Cook Time - 35 minutes

Ingredients:

Standard two-crust pie crust of your choice (It was late and I didn't have the energy to make a homemade crust.  I used the Betty Crocker - Just Add Water Mix.)
Can of cherry pie filling (I told you it was late didn't I?)
1/2 tsp Almond extract
1/4 cup mini chocolate chips

2 - 3 Tbsp Sugar (to sprinkle)

Preheat oven to 375 degrees.  Prepare the bottom portion of an unbaked pie crust in your pie plate.  In a separate bowl, lightly mix with a spoon the cherry pie filling and almond extract.  Poor the filling in the pie crust.  Spread the mini chocolate chips on top of the pie filling.  Top with the top portion of the unbaked pie crust.  I chose to make a lattice with mine.  You can do anything you'd like, just make sure that you vent the crust well.  Pinch or crimp crust with a fork.  Sprinkle the top of the pie with sugar.  Top pie with a pie crust shield or line the edges of the pie with strips of foil.  Bake in preheated oven for 30 minutes or until golden.  Remove the shield/foil from the edges and bake for 5 more minutes.  Cool and serve warm with vanilla ice cream!  


Linked up at these fun parties:


I received one or more of the products mentioned above for free using Tomoson.com. Regardless, I only recommend products or services I use personally and believe will be good for my readers. I am disclosing this in accordance with the Federal Trade Commissions 16 CFR, Part 255 Guides Concerning the Use of Endorsements and Testimonials in Advertising. Tomoson Product review & giveaway Disclosure.


Wednesday, November 17, 2010

Recipes I Can't Wait to Try! #9

Oh my goodness!!!  I have had it in my head that it is Tuesday!  I'm so sorry I'm so late at getting this post out!  Putting a big "L" on my forehead right now.  So embarrassed.

This weather is screaming for warm soups!  So I have chosen to feature the groovy recipe below for this week.

Photo is property of Hun... What's for Dinner?


Creamy Chicken Tortilla Soup at Hun...What's for Dinner?


Now let's see some Recipes I Can't Wait to Try!  Link up your yummy recipes & fun crafts!  My request is that you please link back to me in some way and say, "Hi!" to another party goer!  Everyone loves getting a new comment, so show some love!  =)  Also, this week I've made it a blog hop, so feel free to add it to your own blog.  Enjoy!


If you were featured, feel free (but not pressured) [=)] to grab my button!
Photobucket 


Recipes I Can't Wait to Try!

Wednesday, November 10, 2010

Challah


Challah is such a beautiful bread!  The way the it gets that dark golden crust makes mouth start to salivate.  You know that when you put it in your mouth that it will be sweet and wonderful.  For those of you that may not know what Challah is, it is a traditional Jewish bread.  It is typically braided in the shape of a loaf or into a ring.  Either way it is done, it is gorgeous!  I found this recipe on AllRecipes.com but I followed some of the tips from the people that commented.  So, here is the recipe that I used adapted from AllRecipes.com.


Challah
Prep Time: 30 Minutes
Cook Time: 40 Minutes
Ready in: 3 Hours 40 Minutes


Ingredients:
1 1/4 cups warm water (110 degrees F / 45 degrees C)
2 1/4 teaspoons of active dry yeast
1/2 cup & 2 Tablespoons honey (divided)
2 Tablespoons vegetable oil
4 eggs (divided)
2 teaspoons salt
4 - 5 1/2 cups unbleached AP flour (depending on humidity)
1 Tablespoon poppy seeds (optional)
1 cup raisins (optional)


Directions:

    • In a large bowl, sprinkle yeast over barely warm water. Beat in 1/2 cup honey, oil, 1 egg, 3 egg yolks (save the whites for later), and salt. Add the flour one cup at a time, beating after each addition, graduating to kneading with hands as dough thickens. Knead until smooth and elastic and no longer sticky, adding flour as needed. Cover with a damp clean cloth and let rise for 1 1/2 hours or until dough has doubled in bulk.
    • Punch down the risen dough and turn out onto floured board.  Knead for five minutes or so, adding flour as needed to keep from getting sticky. Divide thirds and roll into long snake about 1 1/2 inches in diameter. Pinch the ends of the three snakes together firmly and braid from middle. Either leave as braid or form into a round braided loaf by bringing ends together, curving braid into a circle, pinch ends together. Grease baking tray and place finished braid or round on each. Cover with towel and let rise about one hour.
    • Preheat oven to 375 degrees F (190 degrees C).
    • Beat the remaining egg whites with 2 Tablespoons honey and brush a generous amount over each braid. Sprinkle with poppy seeds if desired.
    • Bake at 375 degrees F (190 degrees C) for about 40 minutes. Cover the loaf with foil the last 10 minutes to prevent to much darkening of the crust.  Bread should have a nice hollow sound when thumped on the bottom. Cool on a rack for at least one hour before slicing.


    Linked up at these fun parties:


    Recipes I Can't Wait to Try! #8

    I tell you, the recipes y'all link up just get better and better!  My recipe box is getting more and more full!  Thanks so much to those of you that have been loyal "linkers" the past several weeks.  I'm glad you keep coming back!  OK, on to my favorite for last week...

    Photo is property of Sweet as Sugar Cookies


    Could you just die?!  These look soooo yummy.  Talk about making lemons out of lemon-aid.  ;-)

    Pumpkin Blondies (By Accident) by Sweet as Sugar Cookies


    Now let's see some Recipes I Can't Wait to Try!  Link up your yummy recipes & fun crafts!  My request is that you please link back to me in some way and say, "Hi!" to another party goer!  Everyone loves getting a new comment, so show some love!  =)  Also, this week I've made it a blog hop, so feel free to add it to your own blog.  Enjoy!


    If you were featured, feel free (but not pressured) [=)] to grab my button!
    Photobucket 


    Recipes I Can't Wait to Try!

    Wednesday, November 3, 2010

    Recipes I Can't Wait to Try! #7

    Woohoo for Recipes I Can't Wait to Try #7!!!  =)  I really dig on linky parties.  It's the BEST way to find yummy new treats to try!  Here are a couple of my favorites from last week:

    Photo is property of Joseph's Grainery


    Glazed Pumpkin Donuts with Whole Grain Flours at Joseph's Grainer

    I don't know how I can express my love for donuts.  But with whole grain flours...I think my heart will beat out of my chest!


    Photo is property of A Latte' with Ott, A


    Egg Brunch Casserole at A Latte' with Ott, A
    Y'all know I'm always late...so...this goes without saying.


    Now let's see some Recipes I Can't Wait to Try!  Link up your yummy recipes & fun crafts!  My request is that you please link back to me in some way and say, "Hi!" to another party goer!  Everyone loves getting a new comment, so show some love!  =)  Enjoy!


    If you were featured, feel free (but not pressured) [=)] to grab my button!

    Photobucket 


    Recipes I Can't Wait to Try

    Tuesday, November 2, 2010

    Black Forest Cheesecake


    Last night I made my very first cheesecake.  I honestly thought that it would come out looking beautiful and perfect.  Well friends, I thought wrong! =)  I found this recipe on Chef De Cuisine.  They don't have a picture of their cheesecake, but I can promise you that it looked prettier than mine.  

    Here are the things that did go right:
    • The cake itself tastes very good.  
    • It's creamy, rich, and chocolaty.  
    • The texture came out perfect.  
    Here are the things that didn't go so right:
    • Mine just didn't come out of the oven as pretty to the eye as I would have hoped.  
    • For a black forest cheesecake, it wasn't as dark colored as I expected it to be.  
    • My crust doesn't want to stick to the cake and is difficult to cut. 
    • There were cracks along the top edges of the cake.


    What I learned:

    • Run a knife around the cake before you chill it. Then run the knife back around the cake before you open the spring-form pan.  If you don't this happens...


    =(
    • When it is baking, the cake will rise really high, but don't panic.  =)  The cake goes back down as it cools.
    • Cherry pie filling and whipped cream will hide an ugly cake. ;-)
    This is another recipe that I would LOVE some more experienced people to comment on.  Here is the recipe word for word from Chef De Cuisine with my tips at the end:


    Black Forest Cheesecake
    makes: 10-12 servings

    Crust:
    1 1/4 cups Graham wafer crumbs
    1/4 cups sugar
    1/2 cup butter, melted
    3 packages (8 ounce each) cream cheese, softened
    1-12 ounce can condensed milk
    8 ounces semi-sweet chocolate, melted, cooled
    4 eggs
    2 teaspoons vanilla
    1-19 ounce can cherry pie filling
    Whipped cream
    Chocolate curls

    Crust:
    Combine crumbs, sugar and butter; press firmly on bottom of 9-inch spring form pan.

    Filling:
    Preheat oven to 325 degrees. In an electric mixer bowl, beat cream cheese until creamy. Gradually beat in condensed milk, chocolate, eggs, and vanilla. Pour into prepared pan.
    Bake for 50-55 minutes or until set. Cool. Chill. Top with the pie filling. Garnish with whipped cream and chocolate curls.


    My tips for this recipe:

    • I used 1- 12oz can of sweetened condensed milk.  The recipe doesn't specify.
    • I did an oreo crust rather than the wafer cookies.  I also omitted the sugar from the crust.
    I can't wait to hear from those of you more experienced than I am on how I can improve my cheesecake making skills. ;-)  


    handmade projects

    Wednesday, October 27, 2010

    Recipes I Can't Wait to Try! #6

    Yay for Wednesday!  I want to apologize to those of you that linked up last week, and I didn't get a chance to comment on your blog.  We had a death in the family and I wasn't on my computer at all the majority of the week.  But I'm back now and can't wait to see what is linked up!  So here are some Recipes I Can't Wait to Try from last week.

    Photo is property of Making Memories With Your Kids

    Caramello Bars at Making Memories With Your Kids


    Photo is property of My Crazy Simple Life


    Re-Vamped Raspberry Cupcakes at My Crazy Simple Life


    Yum! Yum! Yum! And why not...one more. YUM!  Now let's see some Recipes I Can't Wait to Try!  Link up your yummy recipes & fun crafts!  My request is that you please link back to me in some way and say, "Hi!" to another party goer!  Everyone loves getting a new comment, so show some love!  =)  Enjoy!


    If you were featured, feel free (but not pressured) [=)] to grab my button!

    Photobucket 


    Recipes I Can't Wait to Try!

    Tuesday, October 26, 2010

    Mini Cinnamon Roll Cookies


    It's no secret that I enjoy cinnamon rolls.  (a lot!) I consider them an ultimate comfort food.  Previously, I have posted recipes for 90 Minute Cinnamon Rolls & for Cinnamon Roll Pancakes.  In all honesty, I am in need of comfort.  My grandfather went to be with the Lord 1 week ago today in an accident.  My heart is broken for his life which was cut too short and for my grandmother who must learn to live life without her husband.  He was a good man, a man of honor.  He was there to help anyone in need.  He loved people.  He loved to tell jokes and to laugh.  And one of my favorite things, my grandfather loved to eat!  He had quite a sweet tooth and my grandmother made sure and helped him out with that. =)  So I feel that it is fitting that for my last week of the official Month of Cookies on At Home With Haley I had already planned to make Mini Cinnamon Roll Cookies.   So in honor of one of the greatest men to ever be a part of my life, I give you this yummy recipe.  I found it in Taste of Home Magazine Oct/Nov 2010.  They are a little time consuming, but they turned out wonderful!

    Here is the word for word recipe.  I will post my tips at the end.

    Mini Cinnamon Roll Cookies
    Prep: 1 hour Bake: 10 min/batch + Cooling
    Yield: About 2-2 1/2 dozen

    1 cup butter, softened
    1-3/4 cups sugar, divided
    3 egg yolks
    1 Tbsp. plus 1 tsp honey, divided
    1 tsp vanilla extract
    2 1/2 cups all-purpose flour
    1 tsp baking powder
    1/2 tsp salt
    1/2 tsp cream of tartar
    1 Tbsp ground cinnamon
    8 oz white baking chocolate

    In a large bowl, cream butter and 1-1/4 cups sugar until light and fluffy.  Beat in egg yolks, 1 Tbsp honey, and vanilla.  combine the flour, baking powder, salt, and cream of tartar; gradually add to creamed mixture and mix well.

    Shape a heaping tablespoonful of dough into a 6-in. log.  In a shallow bowl, combine cinnamon and remaining sugar; roll log in cinnamon-sugar.  Loosely coil log into a spiral shape; place on a greased baking sheet.  Repeat, placing cookies 1 in. apart.  Sprinkle with remaining cinnamon-sugar.

    Bake at 350 for 8-10 minutes or until set. Remove to wire racks to coll completely.  In a small bowl, melt baking chocolate with remaining honey; stir until smooth.  Drizzle over cookies.  Let stand until set.  Store in an airtight container.

    My tips for this recipe:

    • Don't try to take these cookies off of your pan too quickly.  Let them sit for about 5 minutes.  Trust me...or your cookies will look like this. =(    ---->


    • For the chocolate:  Place a zip top bag in a tall tumbler. Using a rubber spatula, put the chocolate in the bag.  Zip bag then cut a hole in one of the corners to drizzle over the cookies.


    Wednesday, October 20, 2010

    Recipes I Can't Wait to Try! #5

    OMGSH!  Last weeks linky party was so much fun!!!  Thanks to those of you that linked up!  I'm afraid that my waistline isn't going to appreciate these linky parties as much as my mouth does. ;-)  Here are a couple of my favorites from last week: 

    It is the official Month of Cookies on At Home With Haley!  Soooo naturally I was drawn to these amazing little things.
    Photo is property of Small Town Life


    These caught my eye too.  Twix is my favorite candy bar!  Yummy!
    Photo is property of Oxford Impressions


    I can't wait to see what is linked up this week!  So come on!  Link up your yummy recipes & fun crafts!  My request is that you please link back to me in some way and say, "Hi!" to another party goer!  Everyone loves getting a new comment, so show some love!  =)  Enjoy!


    If you were featured, feel free (but not pressured) [=)] to grab my button!
    Photobucket 


    Recipes I Can't Wait to Try!

    Tuesday, October 19, 2010

    Healthy-er No Bake Cookies


    Yay for week 3 of the official Month of Cookies on At Home With Haley!!!  OK, so I have made no bake cookies many times.  And every time I do, I think about all of the possibilities to make my recipe healthier.  My husband and I are trying more and more to eat with less hydrogenated, high fructose-d, foods.  And I figured that it was worth a shot.  The problem is that I'm usually making them to take somewhere and am afraid to experiment.  Alright!  You've got me.  That's not why I haven't tried it.  It's because I'm afraid to experiment while doing any sort of baking.  *Hanging my head in shame*  I do really well at following a recipe, but I'm afraid to branch out.  It's funny because when I'm cooking dinner, I experiment all of the time!  For some reason I'm nervous when it comes to flour and sugar.  But today...I did it!  I put my toe to the line and tried it.  Now I realize that NO BAKE cookies isn't baking...but it's a start!  I adapted this recipe from one that my aunt gave me years ago.  I have no idea where it came from so I can't credit it anywhere.  I realized that after I finished the cookies that I forgot to put vanilla in them. (oops!) But I think they are fine without it.  If you try it with vanilla, let me know how it turns out!  The result?  A pretty tasty cookie!  It has a honey flavor, which I'm all over.  And I don't have to feel totally guilty if I eat 2...OK...4. =)  Now the downside.  I guess this is what happens when you experiment.  They are a little sticky.  I guess from the honey.  And they didn't harden like I would have liked.  Maybe done with 1/4 cup honey would have been better.  I don't know.  I'd love to hear from some of you more experienced than I in the kitchen.  So I experimented and came out with a tasty, but not perfect cookie. I'm sure even Picasso had some less than stellar projects.  =)

    Healthy-er No Bake Cookies
    1 cup packed brown sugar
    1/2 cup honey
    3 Tablespoons Cocoa (I used the dark chocolate cocoa)
    1/2 cup milk
    1/2 cup Natural Jif Creamy Peanut Butter
    1/4 cup milled flax seed
    1/4 cup wheat germ
    3 cups Oatmeal (I used "Old Fashioned")
    1 teaspoon vanilla (optional)

    Combine sugar, honey, cocoa, and milk in a large sauce pan.  Stirring constantly, bring to a boil.  Remove from heat and stir in peanut butter.  Add flax seed, wheat germ, and oatmeal.  Stir well.  Drop tablespoon sized lumps onto cookie sheets lined with parchment paper.  Allow to cool for 1 hour before devouring.

    If you'd like to try the regular version....

    2 cups sugar
    3 Tablespoons Cocoa
    1/2 cup milk
    1/2 cup peanut butter
    1 teaspoon vanilla
    3 cups oatmeal

    Combine sugar, cocoa, and milk in a large sauce pan.  Stirring constantly, bring to a boil.  Remove from heat and stir in peanut butter.  Add oatmeal.  Stir well.  Drop tablespoon sized lumps onto cookie sheets lined with parchment paper.  Allow to cool for 1 hour before devouring.

    LinkWithin

    Related Posts with Thumbnails